What Is Visual Regression Testing? A Practical Guide
Your test suite checks logic, data flow, and user journeys, but not whether the UI actually looks right. Visual regression testing catches what other tests miss.
Your test suite probably covers logic, data flow, and user journeys. But testing everything on screen is not possible
Visual regression testing catches what they miss. It captures screenshots of your app — a web page, a mobile screen, a frame from a game — compares them against approved baselines, and flags visual differences for review before they get in front of a user.
Why Visual Changes Slip Through
CSS is global by default, and a padding tweak on one component can cascade into layout shifts across dozens of pages. A font update can reflow text, or a dependency upgrade can subtly change rendering. None of these trigger test failures in a traditional suite as they don't change the behaviour.
Code review catches some of it, manual QA catches some more, but both rely on human attention that doesn't scale. When your app has hundreds of pages, states, and breakpoints, visual bugs become a statistical certainty.
It gets worse for a game. There's no DOM to inspect, no CSS to audit — just pixels on screen. Will your playtesters notice that the tint of a light got shifted because of a bug in a shader? Or that a texture is loading at the wrong mipmap level? These are the kinds of regressions that slip through playtesting and only surface in bug reports weeks later.
How Visual Regression Testing Works
The process follows a simple loop:
- Take screenshots of your UI in a consistent environment (same browser, viewport, OS, ...).
- Diff each screenshot against its approved baseline using an image comparison algorithm.
- If differences are detected, review the diff to decide: intentional change or regression?
- Approved changes become the new baseline. Regressions must be fixed.

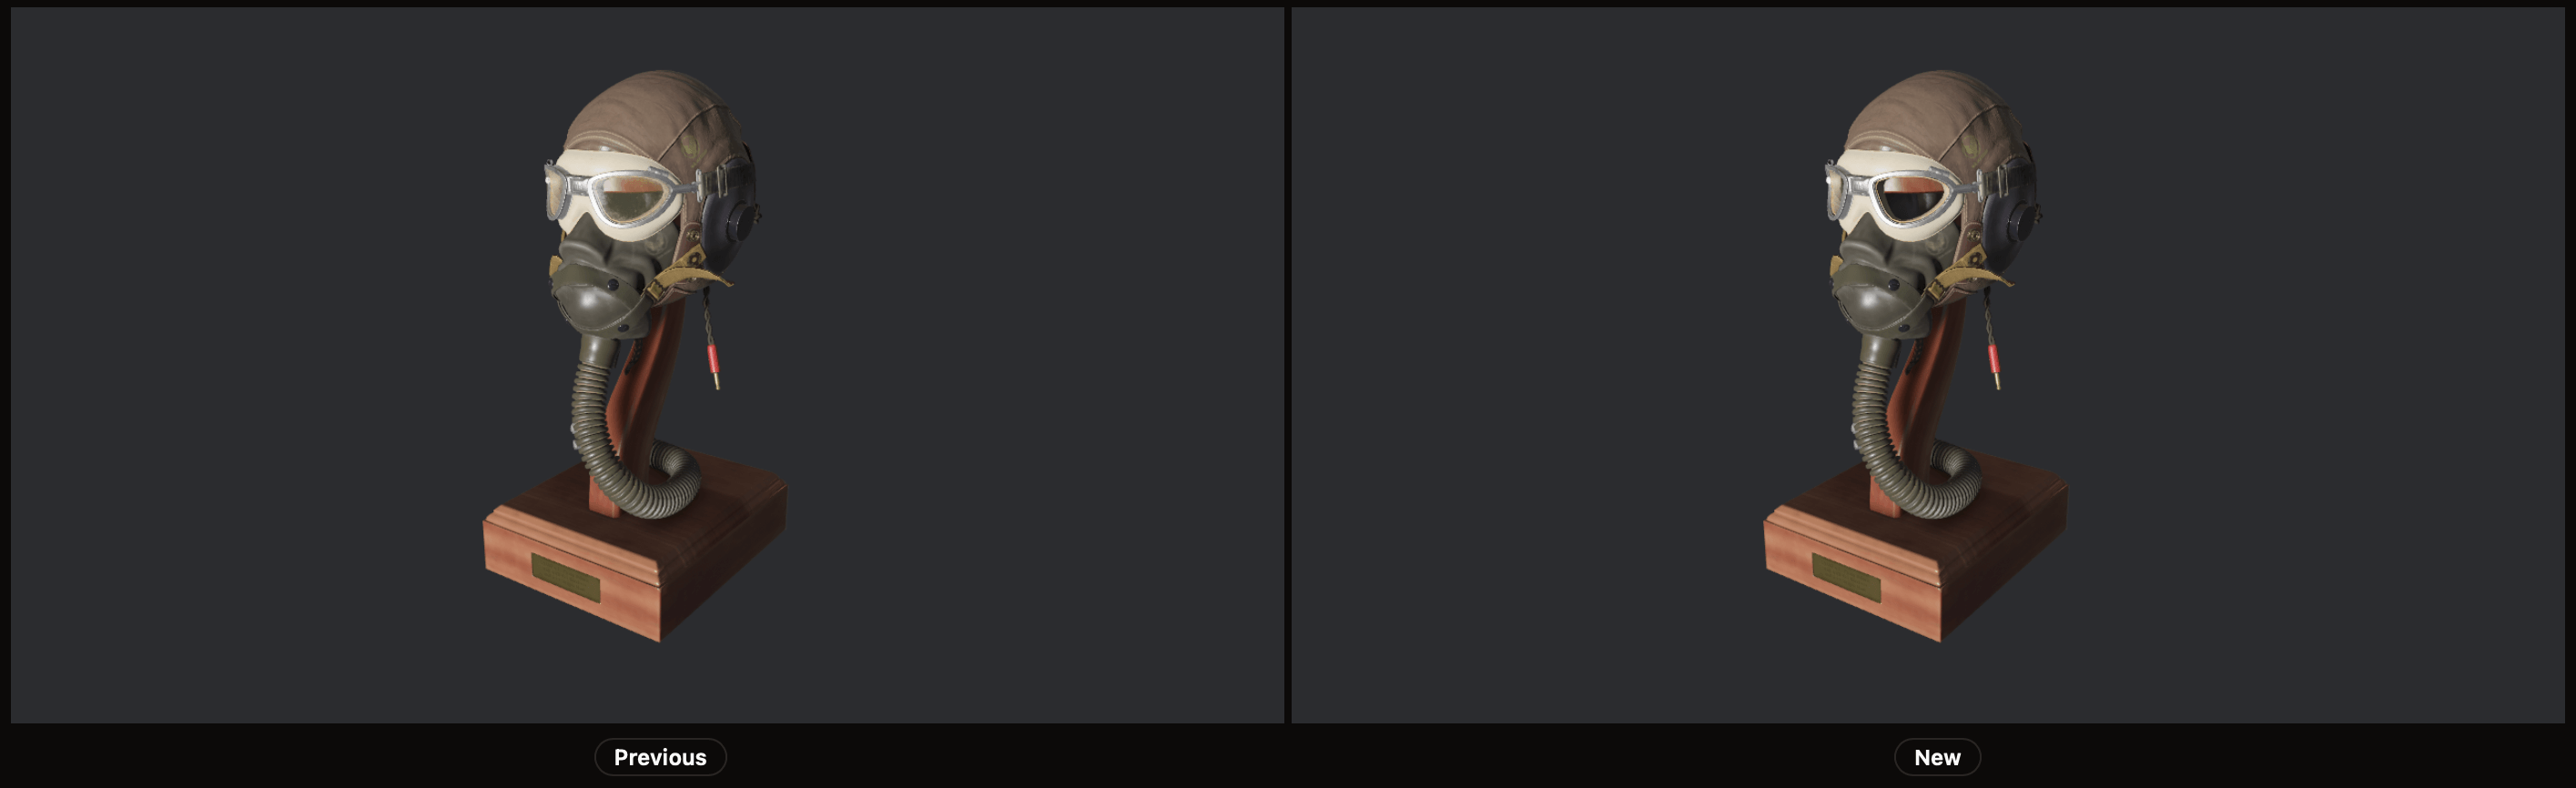
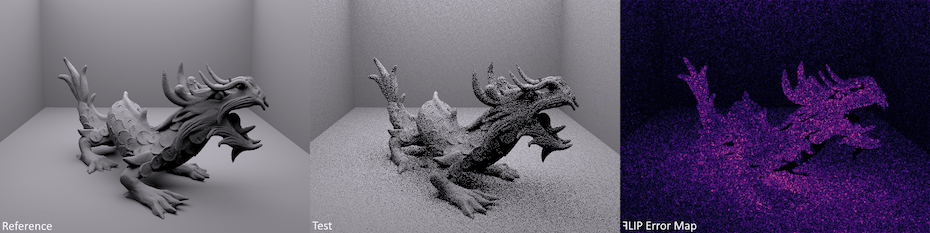
The comparison step is where tools diverge. Some use pixel-by-pixel diffing, which is precise but noisy. Some use content / structure aware methods, like HTML nodes and hierarchy, to focus on the relevant parts. Others use perceptual algorithms like NVIDIA ꟻLIP that model human vision, reducing false positives from anti-aliasing, sub-pixel rendering, and other imperceptible differences.
What Makes a Good Visual Testing Setup
Deterministic Screenshots
The biggest challenge in visual testing is consistency. If your screenshots vary between runs due to animations, dynamic content, or rendering timing, you'll drown in false positives. You can take steps to ensure deterministic screenshots:
- Disable or pause animations
- Mock dynamic content (timestamps, avatars, random data)
- Wait for network idle and font loading
- Wait for all assets to be loaded, shaders to be compiled
- Use consistent viewport sizes and device pixel ratios
Smart Comparison
Pixel-perfect diffing sounds ideal until you realize that sub-pixel anti-aliasing differences between CI environments generate noise on every run. Perceptual comparison algorithms like ꟻLIP evaluate differences the way human eyes perceive them, filtering out invisible changes and surfacing only the ones that matter.
Where Visual Testing Fits in Your Pipeline
Visual regression testing works best as a change-level check:
- Developer opens a pull request.
- CI runs the test suite, including visual tests.
- Visual test results appear as a status check.
- If differences are detected, the developer reviews the visual diff.
- Approved changes update the baseline. Regressions get fixed before merge.
This keeps visual testing in the flow of normal development rather than as a separate QA step that happens after the fact. The same workflow applies to game development — engines like Bevy, Unity, and Unreal all support rendering in CI, making automated frame capture possible.
Common Approaches
| Approach | Pros | Cons |
|---|---|---|
| Component-level (Storybook, etc.) | Fast, isolated, covers all states | Misses layout/integration issues |
| Page-level (full-page screenshots) | Catches layout shifts, closest to user experience | Slower, more baseline churn |
| Scene-level (game frame captures) | Catches rendering, lighting, and shader regressions | Requires deterministic scenes and fixed camera setups |
| Hybrid | Best coverage | More setup and maintenance |
For web apps, most teams start with page-level testing on critical user flows, then expand to component-level testing as they gain confidence. For games, a good starting point is capturing key scenes — a main menu, a representative gameplay moment, a lighting-heavy environment — with a fixed camera and deterministic state.
Getting Started with PixelEagle
PixelEagle is designed to make visual regression testing practical:
- NVIDIA ꟻLIP comparison reduces false positives from rendering differences — originally designed by NVIDIA to evaluate generated images quality, making it especially well-suited for games
- A simple CLI that integrates into any CI pipeline in minutes
- Token-based pricing, so you pay for what you use rather than per-seat
A typical setup takes under 10 minutes: create a project and get a token, install the CLI, capture your first screenshots, and add a step to your CI config. From there, every pull request gets automatic visual regression checks.
Visual regression testing catches a category of bugs that other tests simply don't cover. It works best when screenshots are deterministic, comparison algorithms filter out noise, and the whole thing fits into your existing CI workflow without friction. Start with your critical user flows and expand from there.